Start a Craft Business

Make Money Crafting

  • Start a Craft Business
  • Some of My Projects

Favorites from the Inspiration Gallery

Happy weekend my friends!

I can’t wait to share a few of our favorite projects from this weeks party!  WOW!  Talk about motivation, I am feeling like I want to go and take on the world right now!  You guys are amazing!

And be sure to grab a “featured” image if you were featured today!

163362_10151387355591013_1022962374_n railroad-sign

Rustic Railroad Sign by Made In A Day

20130103_5705

Thrifted Guest Bedroom by With A Touch Of Pretty

2013-01-06_0064_edited-1_thumb5

DIY Kindle Cover by Creative Home Expressions

AshbeeDesignPineCenterpc2

Winter Center Piece by Ashbee Designs

conversation-hearts-closewm

Pretty Conversation Hearts by My Fabuless Life

Grey-and-white-drapes-4

Breakfast Nook Makeover by Chronicle of Home

p1100268_zps9ba3dba4

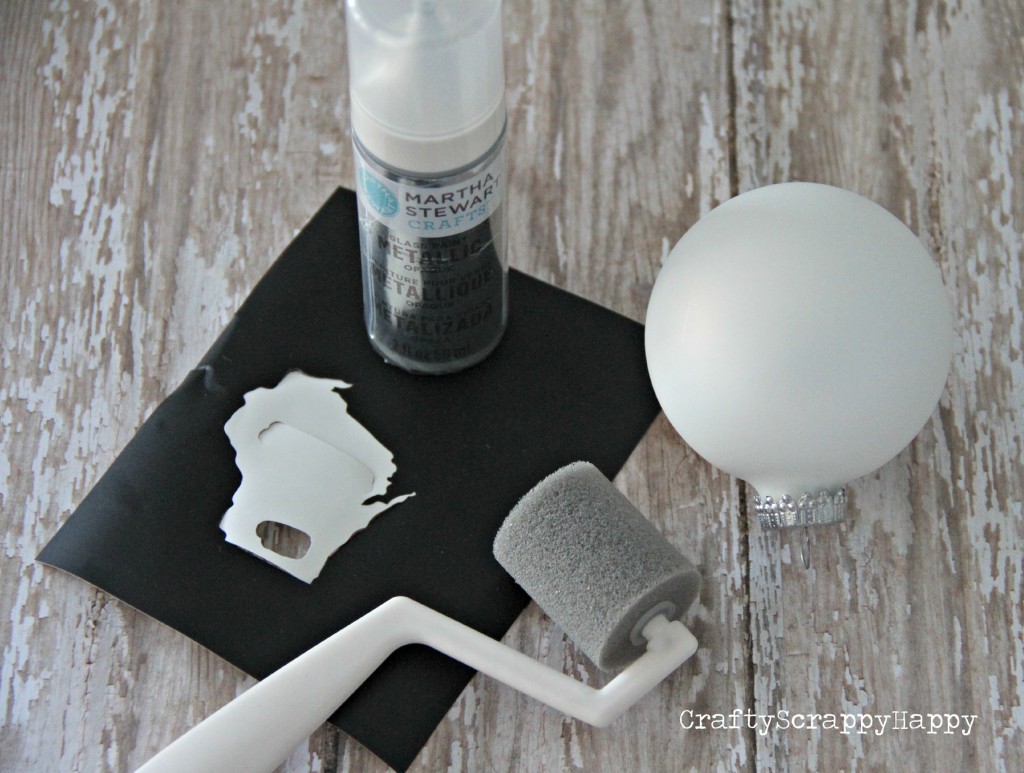
DIY Map Art by Bliss At Home

straight-on-copy

Card Catalogue Makeover by Bad Rabbit Vintage

Metal-Star-Makeover-with-Title

Card Catalogue Makeover by Bad Rabbit Vintage

January-9-2013-p050

Craft Room Reveal by Home Happy Home

laundrysign6

Laundry Room Sign by The Lily Pad Cottage

openkitchencabinetsaquawhite

Open Cabinets by Mom 4 Real

bathroom-design-vanity

*If you would like to pin one of these images, please pin from the original source! Thanks :)

And if you are looking for even more creativity be sure to check out the Inspiration Gallery Pinterst Board!

Personalized “Home” Ornament

One of the things that I ALWAY try make sure I incorporate in my crafting is meaning and I try to follow this even more so around the holiday season.

And one of the biggest things that has happened this year for my husband and I was that we purchased our fist house (as many of you know).  And so of course I am all about making all kinds of special and meaningful ornaments this year having to do with “Home”.

Personalized DIY Home Ornament via Crafty Scrappy Happy

This is my first personalized “home” ornament and I am really loving how special it is!

homeornament1-682x1024

And what makes it even better, is that it was simple to make!

homeornament3-1024x773

I used my sihouette cutter to cut out the state of Wisconsin on a piece of vinyl, but this step could also be done by tracing an outline of your “home” state as well.  Next I applied the vinyl to the ornament and then used a Martha Stewart glass paint to add the state.

homeornament5-1024x864

Then after the paint dried, I used glue to add glitter to the state.

homeornament4-1024x682

Finally I added the wording with StazOn in and my favorite dollar section alphabet stamps.

homeornament-1024x682

Sweet and simple and a great personalized way to dress up your tree or create a special gift for friends or family!

Make more money with your crafts by reading How to Make Crochet Products That Actually Sell.

Driftwood Stocking Holder DIY

Beach-y + Christmas.  Yes, I LOVE that idea!

I was thinking of creative ways to hang my stockings since I don’t have a mantel at my new house this year and so I decided to scrounge around a bit and get creative.

-family-room

And here is what I came up with!  My driftwood stocking holder!  I had found this piece of driftwood on a walk around the lake a few months back… and in true craft hoarding fashion it sat in my garage for that entire time.  Until I found its perfect use!

diy driftwood stocking holder

All I did was use painters tape and red paint to add my “candy cane” stripes.

Then I grabbed some super generic hooks from Target that came in a two pack and added them with the screws that they came with.

My stockings now hang happily over my desk and I LOVE them!

Sweet and simple and a perfect use of my driftwood.

If you don’t have a mantel how do you hang your stockings?!  I would LOVE to know!

Find out How to Better your Craft Business Advertising.

Let it Snow {DIY ornament}

I have to say, I am more than a little obsessed with making my own Christmas tree ornaments.  And they are tending to all be white and light!  This project is no exception.  I had fun using some new Lifestyle Craftscutting dies, the were the perfect way to transform a normal ornament into a perfect snow globe!

e097cf4a308728e6d6b434353b8b075a

From the new Knotty or Nice collection I used the “nice gift set” dies for this project.

Before I decided on plain white cardstock, I played with aluminum foil which made for a VERY cute snowflake as well!

{More projects to come!!!}

77ee687d3671b74a7510ff6cf4826649656adfbc01a3a5535045bcea42f5c02a

I used my dollar section alphabet stamp set to add the wording to the snowflake.

Once my snowflake was cut and stamped, I then rolled it slightly and stuck it in the top or the clear ornament.

 Disclosure:  I was not compensated to write this post, but I did receive dies to review.  All opinions are my own.

I am linking up to a few of my favorite parties this week, be sure to check them out for some amazing inspiration!

Find ways to Write Descriptions to Sell Your Craft Products and make more money.

I am part of a Trim The Tree Series today!

TrimTheTree-001200x200

I am excited to let you know that I am part of one of the cutest Trim the Tree Series around hosted by my friend Jenn at Clean and Scentsible and today is my day!  Be sure to go over and check out my ornament AND the other AMAZING ornaments that have already been shared!

AND, Happy Hour the Link Party is BACK this week after our Thanksgiving break, be sure to get all linked up tonight!  I can’t wait to see what you have been up to for the last TWO week!!!

DIY Candy Cane Canvas

It is official.  Christmas crafting is in full swing at my house, and so it is only appropriate that it is full swing here on my blog as well.  Lets start this holiday crafting season nice and simple.  How about a cute use for a canvas, ribbon and chipboard letters?!

joysign1-1024x682

Yep that is all it took to make my sweet and simple Candy Cane Canvas.

joysign2-1024x734

I can’t help but be happy when I look at it…. mmmm and maybe a little thirsty for a candy cane mocha coffee!

joysign-1024x512

So all I did to make my canvas is cut ribbon and glue it to the back of a plain white canvas.  (I later covered the back of the canvas with a piece of paper to make it look more finished).  I Then grabbed some chipboard letters that I have had forever just waiting to be used in a project (do you even hold on to crafting materials like that–not knowing what you are going to use them for??) and added glue (from my Martha Stewart glue pen) and some flaky silver glitter to my letters.

joysign4-1024x682

No big deal, but kind of cute and fun right?!  Are you Christmas crafting yet??

DIY Team Spirit Platter

tailgateweek


Welcome back to day 3 of Tailgate Week!!!  I am here with yet another way to add a little personalization to your tailgating!!!

Check out the other posts below!

Day 1. Team Spirit Bunting DIY

Day 2. Personalized Utensil Holder

DIY Team Spirit Platter with Crafty Scrappy Happy

By adding team spirit right to the food platters!

tgplate

I got lucky and found this bright Michigan maze colored plate on clearance at Target and decided to personalize with by using my Martha Stewart Glass paint by Plaid, the scraper tool and some cut vinyl.  I should mention that I cut all of my vinyl with my silhouette cutting machine.  I love it!

tgplate1

I simply put the vinyl on the clean platter and made sure the air bubbles were smoothed out.  Then place the paint around the area to be painted and drag the paint into the image area just like I did with this tutorial here.  Really the only other part that is important, is taking off the vinyl before the glass paint dries (otherwise the paint will stick to the vinyl and peel off)

tgplate8

And there you go, personalized and team spirited!  And I think it goes great with my team spirited bunting from day one of tailgate week and my DIY utensil holder found here.

Want to start a craft business but don’t know the costs to start a craft business.  Read my article.

Tailgating DIY—Personalized Utensil Container

tailgateweek


Happy Happy Tailgate Week!!!!  I am excited to show you my next team spirited project!!!  {In case you missed day one of tailgate week—check out my DIY bunting here}

Personalized Utensil Container at Crafty Scrappy Happy

 I had some fun up-cycling a utensil holder that I found this past weekend in the clearance section of Target, it was a big old $2.95!

Personalized DIY Utensil Container at Crafty Scrappy Happy

 Here is what you will need:  a cut vinyl image, Martha Stewart Glass Paint by Plaid and a scraper tool (white tool pictured above)

tgut3

 I used the same method that I used to decorate my store-bought candle that you can find here.  I used glass paint because it is very adhesive and you can wash it after the paint is fully dry and cured.  And with tailgating you would want to be able to clean up after!!tgut5

I think for a whopping $2.95 this was a good little up-cycle and adds team spirit to my overall look which can be seen here!

tgut1-682x1024

Want to learn how to take high quality photos that will sell your crafts?  Find out by reading my article!

DIY Tailgating Bunting

tailgateweek


I love LOVE love football.  And I love decorating and crafting…. sooooo it should not be surprising that I crafted up my own team spirited Maze and Blue (ohhh yayyyy I am a HUGE University of Michigan fan) tailgate that I will be sharing with you this week!

So, Day 1 of Tailgating the Crafty Way—-starts with DIY team spirited bunting!

DIY Tailgate Bunting from CraftyScrappyHappy.net

I love what the great punch of team colors that bunting can add to a tailgating look!!!  I might just be making more and more version of this of bunting banners, I love the look!  I have to admit, I have never made bunting before mainly because of the sewing.  What in the world was I waiting on, it wasn’t bad at all!?!?  I know there are tutorials and “how to” posts over the blog world… but in true “Jaime” fashion I didn’t check out tutorials I just kind of came up with my own methods….

tgbunting

I ended up finding this cute maze colored chevron fabric at Hobby Lobby and couldn’t find a blue fabric that I was crazy about…. so, I grabbed my husbands old dress shirt that no longer fits him {I wouldn’t just steal a good dress shirt for crafting…. well maybeeee I would… hehe}.  Did I mention I like to reused everything and everything?!


tgbunting1

I just cut up strips of the blue fabric and two triangles joined in the middle.

And I sewed one straight line right on the top to hold each triangle section in place. And that is it, nice and simple and festive all at the same time!

Need to know how to make craft products that stand out from the crowd?


tgbunting2

A beach-y chic wall stencil

Hi guys.

I am SOOOO so SOOOO so SOOOO into decorating right now it isn’t even funny.

I want to try all of the things I have held off on until now… because of the renting verse owning copout, the student versus working woman reality and well the motivation to fix up an old house and make it pretty.

And so, my latest adventure was with stencil and  a wall.

DIY Stenciled Wall via Crafty Scrappy Happy

 not a big wall….

but a wall that may have otherwise been ignored…

and since I was just telling you in this last post {here} that I don’t have many walls now that we renovated and took most of them down, I feel like I have to seriously LOVE the ones that I have!

stenciled63-673x1024

 And I suppose the best part about having an open floor plan now and great room is that when I spiff up a little wall you can enjoy it from all over the room!

{did you see all of the lights in my space???}

stenciled8-608x1024

so how do you feel about stencils?!  I was so scared to add pattern to my house since I worked SO hard to take down all of the patterned wall paper just a few short months ago!

But thankfully stenciling a wall with paint takes MUCH less commitment!  It is easily removed…. and simple to put up—-win win if you ask me!

stenciled5-682x1024

I just love that pattern.

stenciled7-632x1024

simple beach-y chic????

That was my goal anyways!

stenciled4-816x1024

what do you think????

Do you want to know how I did the stenciling?!

stencil1111

and would you like to WIN your own stencil from Cutting Edge Stencils?!?!

Check back NEXT WEEK!!!!

AND if you are new here I would LOVE to get in touch with you!

Facebook

Pintrest

Twitter


« Previous Page
Next Page »

Tips for starting your business

  • What Licenses Do Crafters Need to Sell at Craft Shows?
  • How to Start a Craft Business
  • How Much Money Can You Make with a Craft Business?
  • How To Market a Craft Business
  • Where To Sell Your Craft Products
  • What You Need to Know to Start a Craft Business
  • Starting a Craft Business: Partner Up Or Go It Alone?
  • How To Make Craft Products That Stand Out From The Crowd
  • How to Take High Quality Photos That Will Sell Your Crafts
  • Costs to Start a Craft Business
  • How to Write Descriptions That Sell Your Craft Products
  • How to Make Crochet Products That Actually Sell

Copyright © 2021 Starting a Crafting Business Privacy